How do I print a check register?
Reports
Print the Check Register to verify that the information printed on the checks generated is accurate. The detail report will show you all of the checks and the invoices paid by the check. For a nice clean list of the most recently paid checks, use the Summary [Caselle Master].
In this Topic
Printing a check register
1. Open Connect Accounts Payable > Reports > Check Register.
2. Select a report title.
Check Register - GL Detail [Caselle Master]
Check Register - GL Detail [Caselle Master]
Check Register - Invoice Detail [Caselle Master]
Check Register - Summary [Caselle Master]
3. Select the Report Dates.
How do I change the report date range?
How do I change the date type?
4. Select the Report Type.
The report type determines the type and quantity of information to print on the report.
What is the report type?
Print the information to post to the General Ledger. Use Report Type to select GL Detail.
Print the information on each invoice. Use Report Type to select Invoice Detail.
Summarize transactions by date. Use Report Type to select Summary.
5. Set up the Print Only Merchant Vendor Information checkbox.
Use this option to include checks and invoices associated with merchant vendors. Checks and invoices for non-merchant vendors will not be included if this option is selected.
6. Click the Signature Lines tab.
A signature line is a line that you can add to the report that provides a space for managers and supervisors to sign-off.
How do I add a signature line?
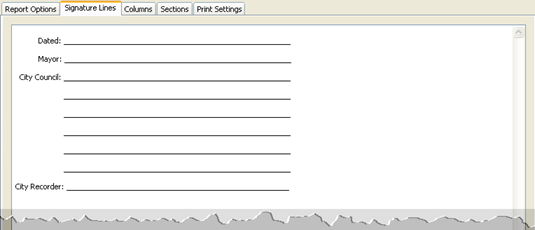
Use the space on the Signature Lines tab to create the signature line. Click on the white space to type in a description. In the example above, the description is Dated, Mayor, City Council, and City Recorder.
Then, use the underscore ( _ ) key on the keyboard to add a line. Press the underscore ( _ ) key again until the line reaches the appropriate length.
7. Click Print (CTRL+P).
The report prints.
Updated 12Sep2018
Printing Check Register - Largest Check Amounts [Caselle Master]
Use this master report to find a check amount or a check with an amount that is greater than x.

Check Register - Largest Check Amounts [Caselle Master]
Video
To see an example of how to use this report, click this link and navigate to time marker 1h0m40s.
Do this...
1. Open Connect Accounts Payable > Reports > Check Register.
2. Select Check Register - Largest Check Amounts [Caselle Master] as the Title.
3. Set up the report dates.
How do I change the report date range?
How do I change the date type?
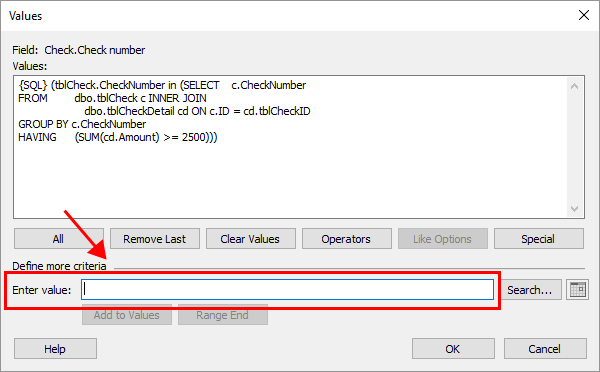
4. Set up the check amount by double-clicking the value next to Check.Check number.

Check.Check number value
The Values form displays on the screen.
Enter the check amount in the Enter Value field.

Enter Value
Click OK.
5. Click Print (CTRL+P).
Updated 12Sep2018
Printing Check Register - GL Detail [Caselle Master]
Show checks by invoice sequence to see exactly how a check has been paid.

Check Register - GL Detail [Caselle Master]
Video
To see an example of how to use this report, click this link and navigate to time marker 1h4m44s.
Do this...
1. Open Connect Accounts Payable > Reports > Check Register.
2. Select Check Register - GL Detail [Caselle Master] as the Title.
3. Set up the report dates.
How do I change the report date range?
How do I change the date type?
4. Set up Use Segment x for Segment Title Columns.
5. Click Print (CTRL+P).
Updated 12Sep2018
Options
Print only merchant vendor information
Use this option to include checks and invoices associated with merchant vendors.
Do you want to print the report for merchant vendors?
Yes, print the report for Merchant Vendors. Click to select Print Only Merchant Vendor Information.
No, print the report for regular vendors. Click to deselect Print Only Merchant Vendor
Report type
The report type determines the type and quantity of information to print on the report.
What is the report type?
Print the information to post to the General Ledger. Use Report Type to select GL Detail.
Print the information on each invoice. Use Report Type to select Invoice Detail.
Summarize transactions by date. Use Report Type to select Summary.
Signature lines
A signature line is a line that you can add to the report that provides a space for managers and supervisors to sign-off.

Signature Lines
How do I add a signature line?
Use the space on the Signature Lines tab to create the signature line. Click on the white space to type in a description. In the example above, the description is Dated, Mayor, City Council, and City Recorder.
Then, use the underscore ( _ ) key on the keyboard to add a line. Press the underscore ( _ ) key again until the line reaches the appropriate length.
Uses segment [ _ ] for segment title columns
Use this option to create a report column. The account segment is the title of the report column. The report column will show the account segment information on the report.
Do you want to print this report for the selected account segment?
Yes, print this report for the selected account segment. Use the Use Segment drop-down list to select an account segment.
No, print this report without columns for an account segment. Select [blank] as the Use Segment.
Related Topics
Copyright © 2025 Caselle, Incorporated. All rights reserved.