A batch is a group of reports that are submitted together for printing. Use Batch Letters/Forms to print letters and forms for a single case or a group of cases.
Manual vs. Automatic Letter Selection
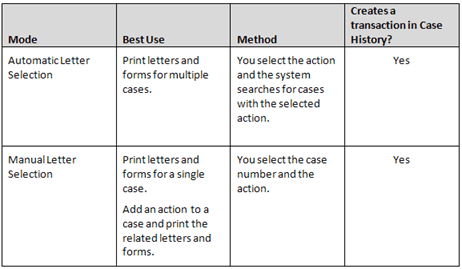
Use Manual mode to add an action to a case and then print the letters and forms for the selected action. You can add actions to additional cases in Manual mode, but you can only do so one case at a time.
Use Automatic mode to select a range of dates and actions, which the system will use to find cases with a follow-up action in the date range. Then, the report will print all of the letters and forms for the selected actions on all of the selected cases.
Important! Printing batch forms will require a form layout. Use Connect Court Management > Organization > Forms to create a new form layout.
Contents Hide
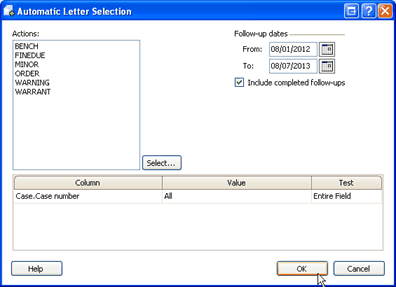
Use Automatic Letter Selection to select a range of dates and the action to associate with the selected cases. This is the easiest way to print the letters and forms that are linked to a specific action that have been assigned to different cases.

Print the Follow-up List to review the cases with actions that fall in the date range. This step ensures the report selection criteria that you will use to set up Batch Letters/Forms is correct.
Do this...
1. Open Connect Court Management > Reports > Follow-up List.
2. Select a report title.
3. Click Print (CTRL+P).
The report prints.
Print the letters and forms for the selected actions. Remember, the report will select the case numbers based on the action and follow-up date range that you selected for the selection criteria.
Do this...
1. Open Connect Court Management > Reports > Batch Letters/Forms.
2. Click Automatic Letter Selection  .
.
3. Click Select. Use the Selection form to move an action, or actions, to the Selected Items list. Click OK.
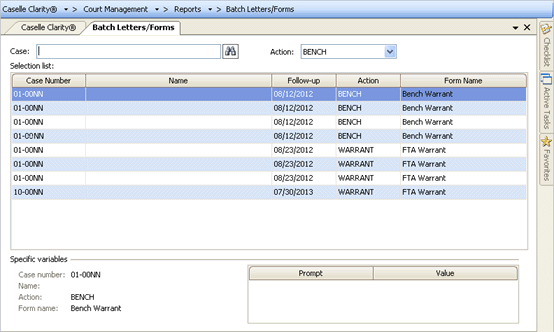
4. The Selection List on the Batch Letters/Forms tab displays the cases that include the selected action.
5. Review the case numbers in the Selection List. Click on each case number to select it. Forms that need you to add extra information to the form before it can print will display the additional variables in the Specific Variables area (located at the bottom of the Batch Letters/Forms tab).
6. Click Print (CTRL+P).
You may be prompted to enter additional variables the system will use to print on the form. Follow the instructions that appear on the screen to enter the report variables.
When the form prints, the system will create a transaction in the case to record the form type and printing date.
The report prints the forms.
Use Manual Letter Selection to add a letter, form, or action to a specific case. This is the best way to print the letters or forms for a single action for a single case.

Do this...
1. Open Connect Court Management > Reports > Batch Letters/Forms.
2. The forms opens in Manual Letter Selection.
3.Use the Case field to enter the case number.
4. Next, use the Action drop-down list to select the action that will print the form or letter.
5. Does the form/letter print on plain paper?
Yes, the form/letter prints on plain paper. Continue to the next step.
No, the form/letter prints on a pre-printed form. Load the pre-printed form in the printer drawer.
6. Click Print (CTRL+P).
The report prints.
Use an action, also known as an action code, to set up follow-up actions to initiate tracking measures in Court Management. For example, Jane uses an action code to send notices and create follow-up tasks to track the sent notices. Jane can also create form groups to create specific letters, forms, envelopes, and labels.
Using Manual Letter Selection
Use the Action drop-down list to select a follow-up action to add to the case history.

Using Automatic Letter Selection
To add or remove follow-up actions from the Actions list. Click Select. Use the Selection form to move the follow-up actions to the Selected Items list. Click OK.

Use Automatic Letter Selection to add cases to the print queue based by action. The system will search for active cases with the selected action that occurs during the date range.
Click Options (F12) to apply bold formatting to forms with specific names.
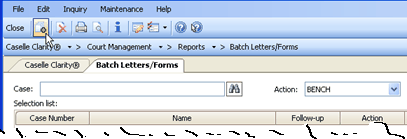
In Manual Selection Mode, use the Case field to select a case number.
What do you want to do?
I want to select a case number. Uses the Cases field to select a case number. The selected case number is highlighted.
Help me find a case number. Click Search.
Use a color code to identify actions that require users to enter additional information. For example, Jane displays form names that require additional information in the color red so she will know when a form has variables that she will need to enter before the form can print.
Do this...
1. Click Options (F12).
2. Click Color  .
.
3. Select a color.
4. Click OK.
Click Options (F12) to set the default to automatic or manual selection. Use automatic selection to print all of the letters and forms at the same time for the selected action code. Use manual selection to add an action code to print a letter or form to a case number.
A defendant is a person who has been charged with a criminal offense or civil action. The Defendant field displays the defendant name associated with the current case.
The From/To date is the date range that the routine will use to select transactions. Use the From date field to enter the first date in the date range. Then, use the To date field to enter the last date in the date range.
A follow-up status is completed when a user records a completed status for the follow-up action in the case history. Use Include Completed Follow-ups to allow the routine or report to select completed follow-ups.
Click Options (F12) to select the default report definition for printing letters or forms.
Use Manual Letter Selection to add a case and the action that specifies which letter/form to print to the print queue.

Click Options (F12) to change the sorting order for action codes, defendant names, and case numbers.
Use the Selection List to review the case numbers that have been added or selected to include in the print queue.
The Specific Variables area displays data for the selected fields.