How do I issue inventory?
Issue Inventory
Record a transaction for distributing inventory to a job, GL account, or location.
Contents
Issuing inventory to an account
Assign inventory to a GL account.
Do this...
1. Open Connect Materials Management > Inventory > Issue Inventory.
2. Select Account as the Issue Type.

Issue type
3. Enter the Inventory Number.
This is the number assigned to an inventory item. The From Location menu will display the default location, but you can use the menu to choose inventory stored at a different location. The Quantity Available shows you how many units are stored at the selected location.

Inventory number
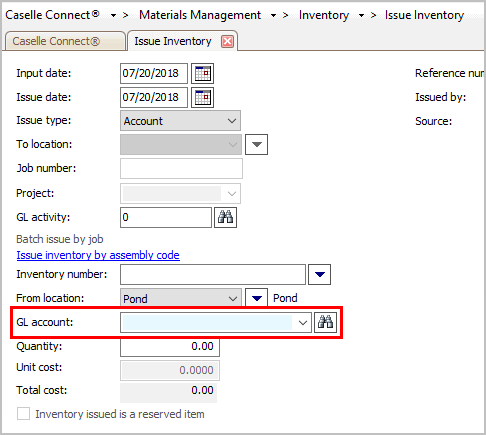
4. Enter the GL Account.
A GL account is an account in the General Ledger that records credits and debits.
GL account
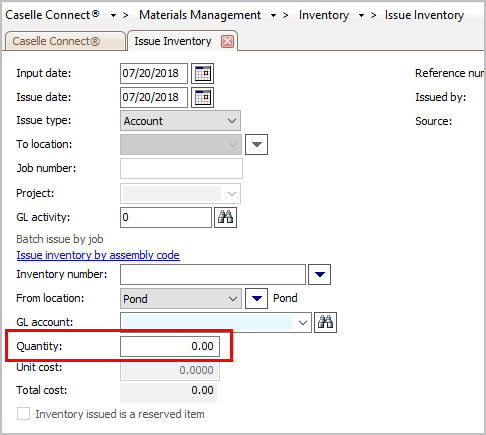
5. Enter the Quantity.
The quantity is the number of items issued. The Total Cost multiplies the Quantity by the Unit Cost.
Quantity
6. Press Enter.
The transaction to issue inventory to an account is saved.
Updated 20Jul2018
Issuing inventory to a job
When jobs are set up in Project Management, you can assign inventory to a job.
Do this...
1. Open Connect Materials Management > Inventory > Issue Inventory.
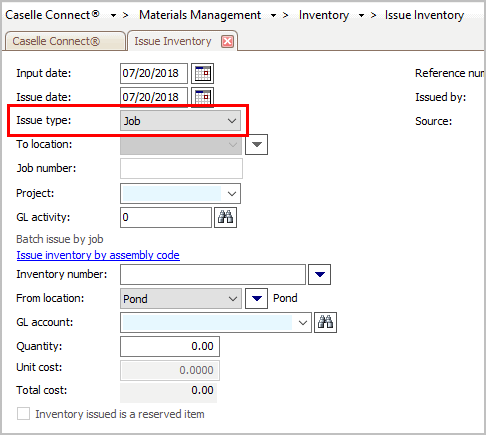
2. Select Job as the Issue Type.
Issue type is job
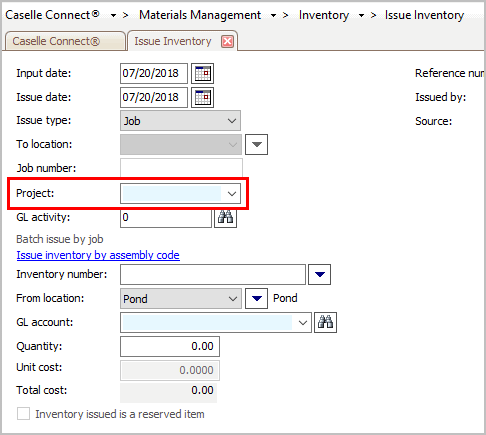
3. Enter the Project.
A project is a large undertaking that involves more than one property. This is a self-validating field. A self-validating field is a field that you can type in anything you wish to enter. You can tell which fields are self-validating because they have a light-blue background. Clicking the drop-down list will display the values that have been entered during previous sessions, or click on the field and type in a new entry. The next time you use the self-validating field, you can find the entry that you just added in the drop-down list.
Project
4. Enter the Inventory Number.
This is the number assigned to an inventory item. The From Location menu will display the default location, but you can use the menu to choose inventory stored at a different location. The Quantity Available shows you how many units are stored at the selected location.
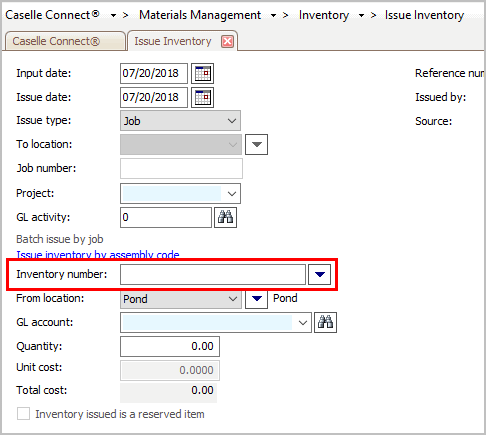
Inventory number
5. Enter the GL Account.
A GL account is an account in the General Ledger that records credits and debits.

GL account
6. Enter the Quantity.
The quantity is the number of items issued. The Total Cost multiplies the Quantity by the Unit Cost.

Quantity
7. Press Enter.
The transaction to issue inventory to a job is saved.
Updated 20Jul2018
Issuing inventory to a location
Assign inventory to a physical address.
Do this...
1. Open Connect Materials Management > Inventory > Issue Inventory.
2. Select Location as the Issue Type.
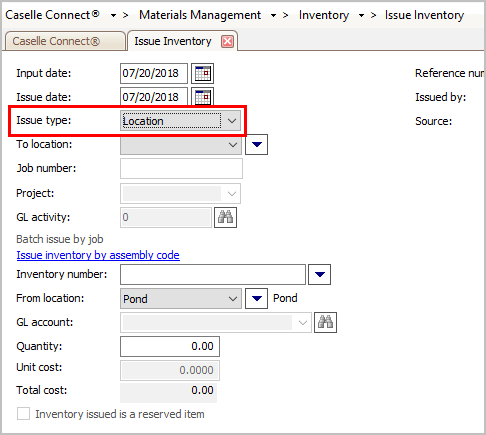
Issue type is location
3. Select the To Location.
You can use the To Location to select the location where the reserved inventory will be sent to.
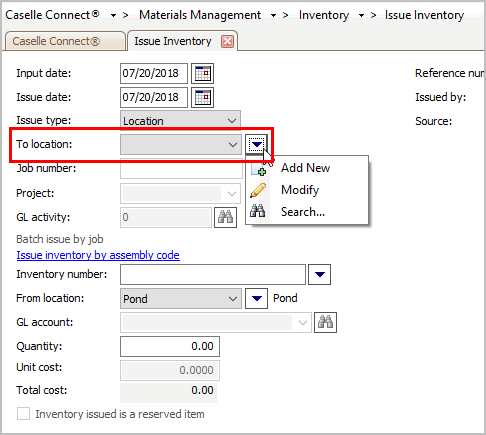
To location
What is the To location?
-
I want to select a saved location. Click on the To Location drop-down list to select the location name.
-
I want to add a new location. Click on the To Location menu and select Add New.
4. Enter the Inventory Number.
This is the number assigned to an inventory item. The To Location menu will display the default location, but you can use the menu to choose inventory stored at a different location. The Quantity Available shows you how many units are stored at the selected location.
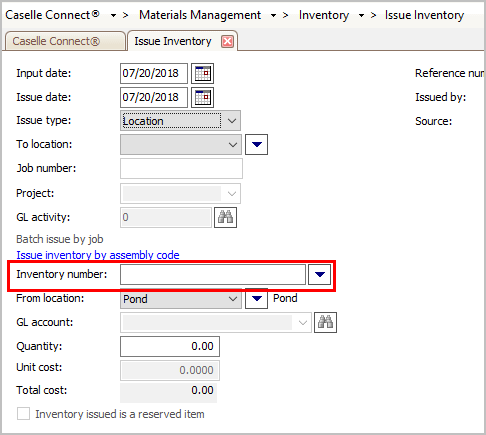
Inventory number
5. Enter the GL Account.
A GL account is an account in the General Ledger that records credits and debits.
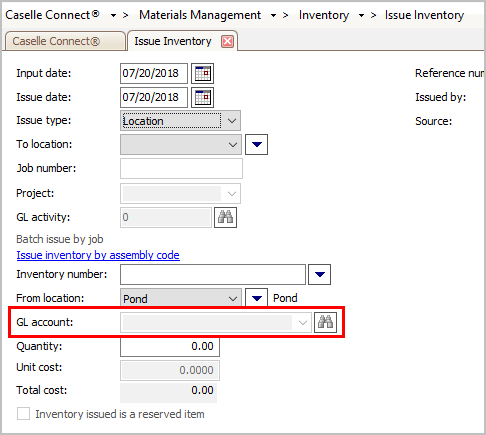
GL account
6. Enter the Quantity.
The quantity is the number of items issued. The Total Cost multiplies the Quantity by the Unit Cost.
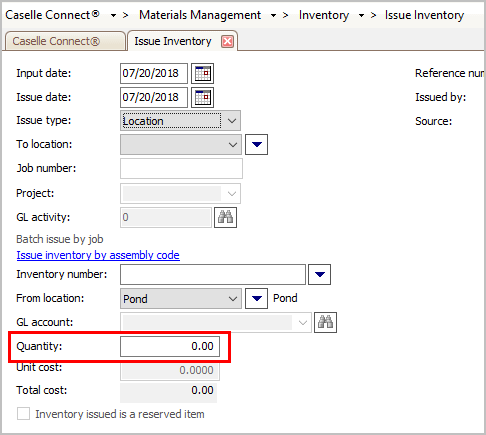
Quantity
7. Press Enter.
The transaction to issue inventory to a location is saved.
Updated 20Jul2018
Aborting a transaction
The Delete (CTRL+D) button has two functions in this program. In New mode, clicking the Delete (CTRL+D) button will abort the current transaction. None of the information on the transaction is saved and a new form is displayed. In Edit mode, using the Delete (CTRL+D) button will remove a saved transaction.
Changing issued inventory
Edit a transaction that records issued inventory.
Has the transaction been updated to the General Ledger?
-
Yes, the transaction has been updated to the General Ledger. Use Connect Materials Management > Inventory > Adjust Inventory to edit the transaction.
-
No, the transaction has NOT been updated to the General Ledger. Use Connect Materials Management > Inventory > Issue Inventory to edit the transaction. Switch to Edit mode (CTRL+E). Then, use Redisplay (CTRL+R) or maximize the console to show the transactions grid, see Show/Hide Transaction Grid. Select a transaction by clicking on it; the selected item is highlighted and the transaction information also displays in the fields on the Issue Inventory form. Now, you can make your changes. Click Save (CTRL+S).
What if I need to edit a transaction with multiple entries attached to it? This is a transaction that was created using Split Mode. You can use Edit mode to enter changes. However, if you make changes to the Issue Type, Job Number, or Project on a split transaction, that information will be updated on ALL of the sequences that are tied to the reference number.
Deleting issued inventory
Remove a transaction that records issued inventory.
Has the transaction been updated to the General Ledger?
-
Yes, the transaction has been updated to the General Ledger. Use Connect Materials Management > Inventory > Adjust Inventory to delete the transaction.
-
No, the transaction has NOT been updated to the General Ledger. Use Connect Materials Management > Inventory > Issue Inventory to delete the transaction. You'll need to enter the Input Date when the inventory was issued. Then, use Redisplay (CTRL+R) or maximize the console to show the transactions grid, see Show/Hide Transaction Grid. Write down the reference and sequence numbers on a piece of paper.
What do you want to do?
-
-
I want to delete a single entry. Click Delete Single Reference and Sequence Number. Then, enter the reference number and sequence number. Example: 1.01
-
I want to delete a range of entries. Click Delete Reference and Sequence Number Range. Now, enter the first and last reference and sequence number in the range. Example: 1.05 to 10.01
-
I want to delete all of the entries entered on the input date. Click Delete All Issued Transactions Input On MM/DD/YYYY. This will erase ALL of the issued transactions that were created on this date. There is no undo for this option. If you're not sure, back up the database before you continue.
-
Options
Batch issue by job
This option is available when the Issue Type is Job.
If the Issue Type is Job, do you want to issue inventory reserved for a job?
-
Yes, I want to issue inventory reserved for a job. Select the job number, then click the Batch Issue by Job link.
-
No, I do not want to issue inventory reserved for a job. Continue to the next step.
To location
You can use the To Location to select the location where the reserved inventory will be sent to.
What is the To location?
-
I want to select a saved location. Click on the To Location drop-down list to select the location name.
-
I want to add a new location. Click on the To Location menu and select Add New.
GL activity
A GL Activity refers to a user-defined code that is created in Connect General Ledger for reporting resources and transactions. The GL activity code can report on subsystems that are interfaced to the Connect General Ledger. This interface provides an efficient means of tracking and reporting on a GL activity code.
If you want to use GL activity codes, do this first.
-
Turn on the interface to Connect General Ledger. This option is located in Organization > Organization > Interfaces tab. If more than one application interface is available, you may need to navigate to the General Ledger subtab. This makes the field for GL Activity available for you to fill in.
-
Set up the GL activity in the Connect General Ledger. Open Connect General Ledger > Setup New Activities. This is the code that you'll use to fill in the GL Activity field.
GL account
A GL account is an account in the General Ledger that records credits and debits.
Is the Issue Type a Job or Account?
-
Yes, the Issue Type is Job or Account. Click on the GL Account field, then type in a valid GL account. You can also Search (F9) this field.
-
No, the Issue Type is Location. Continue to the next step. You do not need a GL account to issue inventory to a location.
Input date
The Input Date is the date the system will use to record the transaction.
Is the correct date displayed?
-
Yes, the dates are correct. Continue to the next step.
-
No, the dates are not correct. Click on the date field, then type in a different MM/DD/YYYY.
Inventory issued is a reserved item
When inventory is reserved, the inventory is being held. When inventory is reserved the quantity that is shown as available at the location will be reduced by the quantity that has been reserved. Reserving inventory makes it easier to coordinate the inventory pull list when a project begins and return reserved inventory that has not been used.
Qty Available at Location = Qty On Hand - Qty Reserved
When a checkmark displays in the checkbox, the inventory that you want to issue is being held in reserve. You can release the inventory by using Reserve Inventory to delete the transaction that reserved the inventory.
Is the Inventory Issued is a Reserved Item checkbox selected?
-
Yes, the checkbox is selected. A reserved quantity exists for the inventory item based on the issue type, issue to, and location. When reserved inventory is issued, the system will create two transactions: a transaction to issue inventory and a reversing transaction to update the reserved quantity to reflect the quantity issued.
-
No, the checkbox is not selected. The inventory item does not have a reserved quantity.
Inventory number
This is the number assigned to an inventory item. The From Location menu will display the default location, but you can use the menu to choose inventory stored at a different location. The Quantity Available shows you how many units are stored at the selected location.
You can Search (F9) this field.
Issue date
The Issue Date is the date the inventory is discharged. The Issue Date will display the current date.
Issue inventory by assembly code
Use this option to look up an assembly by entering the assembly code. The system will look up the assembly and list all of the inventory items required to create the assembly in the grid. You can adjust the quantity. When you're ready, click the Issue button.
If assembly records have been created in the database, you can discharge all of the inventory that is needed to create an assembly.
Do you want to issue inventory by assembly code?
-
Yes, I want to issue inventory by assembly code. Click the Issue Inventory by Assembly Code link. Then, enter the assembly code and quantity. The inventory for creating the assembly displays in the grid. You can edit the information in the grid. If the information is correct, click Issue to continue.
-
No, I do not want to issue inventory by assembly code. Continue to the next step.
Issue type
This is the transaction type. You have three options: Account, Job, or Location. An account is an accounting record that shows increases, decreases, and a balance. A job refers to a user-defined code that is created in Connect Project Accounting for reporting resources and transactions associated with a specific job. A location refers to a physical address.
What is the issue type?
-
I want to issue inventory to an account. Select Account as the Issue Type. Then, enter a GL Activity and GL Account. Use this option to issue inventory to a specific GL account.
-
I want to issue inventory to a job. Select Job as the Issue Type. Next, enter a Job Number, Project, GL Activity, and GL Account. Use this option when Project Accounting is turned on. Project Accounting is a separate application that can interface with Materials Management for better inventory management on projects and jobs.
-
I want to issue inventory to a location. Select Location as the Issue Type. Then, enter a To Location. Use this option when you want to transfer inventory from one location to another location.
Issued by
This is the user who is responsible for issuing the inventory.
Job number
A job number refers to a user-defined code that is created in Connect Project Accounting for reporting resources and transactions associated with a specific job. You can use a job number to manage transactions created in Connect General Ledger and the Connect Project Accounting Suite, which includes Project Accounting, Materials Management, and Asset Management.
What is the job number?
-
I am using Project Accounting. Use the Job Number field to enter it. You can Search (F9) this field.
-
I am not using Project Accounting. Skip this field.
Why is this field is not available?
This field is only available when the Project Accounting interface is turned on. If you want to link the invoice to a job number, open Organization > Organization > Interfaces to make available the Project Accounting fields.
Options for issue inventory
Use Options (F12) to change the default fields and settings.
Do this...
1. Open Connect Materials Management > Inventory > Issue Inventory.
2. Click Options (F12).
3. Do you want to print a Materials Issued Ticket when you issue inventory? All of the options listed below will create an issue transaction type. Remember, you can also use the Print button on the main toolbar or print the Materials Issued Ticket report to batch print issued tickets later.
-
I always want to print a Materials Issued Ticket. Select Print from the Print Materials Issued Ticket When Created drop-down list. Next, select the name of the Materials Issued Ticket from the Materials Issued Ticket Report Title drop-down list.
-
I want to preview before printing. Select Print Preview from the Print Materials Issued Ticket When Created drop-down list. Next, select the name of the Materials Issued Ticket from the Materials Issued Ticket Report Title drop-down list.
-
I want the individual who is issuing the inventory to determine if a printed ticket is needed. Select Prompt Each Time from the Print Materials Issued Ticket When Created drop-down list. Next, select the name of the Materials Issued Ticket from the Materials Issued Ticket Report Title drop-down list.
-
I do not want to print a Materials Issued Ticket. Select No from the Print Materials Issued Ticket When Created drop-down list. The system will not print a Materials Issued Ticket. Remember, you can also use the Print button on the main toolbar or print the Materials Issued Ticket report to batch print issued tickets later.
Print form
Use Print (CTRL+P) to print a Materials Issue Ticket.
Project
A project is a large undertaking that involves more than one property. This is a self-validating field. A self-validating field is a field that you can type in anything you wish to enter. You can tell which fields are self-validating because they have a light-blue background. Clicking the drop-down list will display the values that have been entered during previous sessions, or click on the field and type in a new entry. The next time you use the self-validating field, you can find the entry that you just added in the drop-down list.
Quantity
The quantity is the number of items issued. You can use the Quantity Available grid to find out how many units are available at each location. Clicking on the Available Quantity, shown as a hyperlink, will breakdown the quantity on hand, quantity reserved, and quantity available.
What is the quantity?
-
Use the default quantity for the selected billing code. This information is displayed.
-
Change the quantity. Use the Quantity field to edit the quantity to match the quantity on the sequence.
Why did the quantity change to a different number?
-
If the quantity requested is greater than the quantity on hand, the system will change the value in the Quantity field to reflect the available inventory on hand.
Quantity available
The inventory quantity at each location also displays in the Quantity Available grid. You can use the Quantity Available grid to determine how many items can be reserved at the selected location.
How many of the inventory do you want to reserve?
-
Click on the Quantity field and type in a number. You can key up to two decimal places, for example, ####.##
Redisplay transactions
Use Redisplay (CTRL+R) to show other transactions that were entered on the Input date. For example, the Redisplay tool comes in handy when you need to edit a saved transaction.
Reference number
In New mode, the Reference Number is a read only number. The first digit, the underlined digit in 1.01 is the reference number. The digits that follow the decimal place make up the sequence number. In the previous example, 1.01 is the sequence number.
In Edit mode, you can type in reference number to look up a transaction.
Source
Source refers to the paperwork generated by the individual or organization requesting the issued inventory.
Is there a source document, form, authorization number, etc. that needs to be recorded?
-
The Source field is information only (up to 30 characters).
Split mode
Use Split Mode (F11) to enter multiple entries on the same reference number, job number, and/or project.
How do I turn Split Mode on and off?
Click Split Mode (F11) to enter Split Mode. The system will copy to the next entry the Reference Number, To Location, Job Number, and Project. The system will also start to increment the sequence number. The sequence number is part of the reference number. A reference number is the digit or digits that precede the decimal, shown underlined here as 1.01 A sequence number is the digit or digits that follow the decimal, like this 1.01. When Split Mode is turned on, each new entry is assigned to the same reference number but Split Mode will increase the sequence number by 1.
|
Entry |
Split Mode is OFF the reference number changes |
Split Mode is ON the sequence number changes |
|
1 |
1.01 |
1.01 |
|
2 |
2.01 |
1.02 |
|
3 |
3.01 |
1.03 |
|
4 |
4.01 |
1.04 |
|
5 |
5.01 |
1.05 |
When you are finished entering entries, click Split Mode (F11) again to exit Split Mode.
What if I need to edit a transaction with multiple entries attached to it?
You can use Edit mode to enter changes. However, if you make changes to the Issue Type, Job Number, or Project, that information will be updated on ALL of the sequences that are tied to the reference number.
To location
When the Reserve Type is Location, you can use the To Location to select the location where the reserved inventory will be sent to.
What is the To location?
-
I want to select a saved location. Click on the To Location drop-down list to select the location name.
-
I want to add a new location. Click on the To Location menu and select Add New.
Total cost
Total Cost = Quantity x Unit Cost
Unit cost
The unit cost is the price for a single item or unit.
What is the unit cost?
-
Use the default unit cost for the selected inventory. This information is displayed.
-
Change the unit cost. Click on the Unit Cost field to enter a new unit cost.
Copyright © 2020 Caselle, Incorporated. All rights reserved.